This page presents quick steps to set up and use ILogin.
Page Contents
Existing Users: Sign In and Set Up Your ILogin Account
1-2.
Sign In to Confirm Your Email
3.
Set Up Multifactor Authentication
4.
Set Up Password Recovery
1.
Create Your New ILogin Account
2.
Confirm Your Email
3.
Set Up Multifactor Authentication
4.
Set Up Password Recovery
1.
Sign In to ILogin
2.
Respond to Multifactor Authentication Requests
3.
Respond to ID Verification
Existing Users: Sign In and Set Up Your ILogin Account
1-2. Sign In to Confirm Your Email
If you're an existing user in any of these Illinois programs, do not create a new ILogin account:
Illinois Department of Employment Security (IDES) Unemployment Insurance
Illinois Department of Healthcare and Family Services (HFS)
Illinois Medicaid Program Advanced Cloud Technology (IMPACT)
Illinois Department of Public Health (IDPH) Vax Verify Immunization
Instead, go to the
ILogin Sign In page and sign in with your existing user name and password. Duplicate email accounts are not allowed. After signing in, the Set Up Multifactor Authentication menu appears.
To fully set up your ILogin account, complete these steps in the next section:
3. Set Up Multifactor Authentication
4. Set Up Password Recovery
Back to Top
New Users: Set Up Your ILogin Account
1. Create Your New ILogin Account
To create a new account:
1. Go to the
ILogin Sign In page at: https://ilogin.illinois.gov.
2. On the ILogin Sign In page (shown right), click Sign Up.
3. On the Create Account page, enter your Email address:
4. Enter a Password that satisfies the password criteria that appears.
5. Enter your First name and Last name.
6. Click Sign Up.
7. ILogin sends a verification email to the email you entered.
2. Confirm Your Email 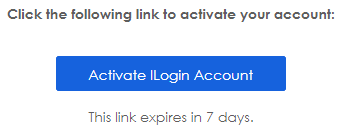
1. Open the email from
State of Illinois.
2. In the email, click Activate ILogin Account (shown right).
3. The Set Up security methods menu appears.
Note: This activation link is valid for 7 days. After this time, you must start these steps over.
For detailed steps, download the Create a New ILogin Account PDF.
Back to Top
3. Set Up Security Methods
The
Set up security methods menu (shown right) offers multiple authentication methods to choose from. It is required to set up at least two
methods. After you are successfully enrolled in a security method, you will see a confirmation. After adding at least 2 security methods, you can click Set Up Later to access the ILogin dashboard.
Steps for each method are presented in the following sections.
Back to Top
1. In ILogin on the Set up security methods menu, click the Email Set up button.
2. ILogin sends a verification email to the email you entered.
3. Open the email from State of Illinois.
4. Click Activate ILogin Account.
Back to Top
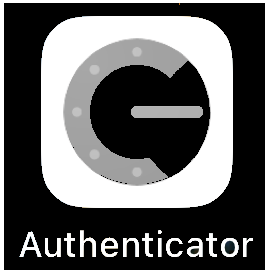
MFA Option: Set Up Google Authenticator
On your iPhone or Android mobile phone:
1. Download and install the Google Authenticator app and open it.
2. Tap Get Started.
3. On the next page, select Scan a QR code. A scan rectangle appears.
In ILogin:
4. In ILogin, on the Set up security methods menu, select Google Authenticator's Set up button.
5. Enter the Password and click Verify.
6. An MFA verification request appears to verify that you are signing in.
7. Complete the requested procedure and click Verify.
8. Click Set up.
9. A QR scan code appears.
On your mobile phone:
10. Position the camera's square over the QR code until it scans the link.
11. Tap Add Account.
In ILogin:
12. Click Next.
13. Enter the 6-digit code from Google Authenticator into the ILogin Enter code field and click Verify.
Back to Top
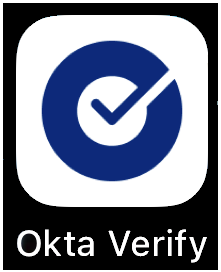
MFA Option: Set Up Okta Verify
On your iPhone or Android mobile phone:
1. Download and install the Okta Verify app. Open the app.
2. At the top, select the + plus sign icon.
3. On the Choose Account Type page, select either Organization or Other (for individuals).
4. Click Scan a QR code. A square outline
appears in the camera.
In ILogin:
5. On the Set up security methods menu, select Okta Verify's Set up button.
6. Enter the Password and click Verify.
7. An MFA verification request appears to verify that you are signing in.
8. Complete the requested procedure and click Verify.
9. Click Set up.
10. A QR scan code appears.
On your mobile phone:
11. Position the camera's square over the QR code. Okta adds your email account in the Okta Verify app.
12. On the Account Added page, tap Done.
Back to Top
MFA Option: Set Up Phone
You can use phone authetication to receive text (SMS) messages to a mobile phone or to receive voice calls on a landline.
In ILogin:
1. On the
Set up security methods menu, click the Phone Set up button.
2. Enter the Password and click Verify.
3. An MFA verification request appears to verify that you are signing in.
4. Complete the requested procedure and click Verify.
5. Click Set up.
6. Select SMS or Voice call.
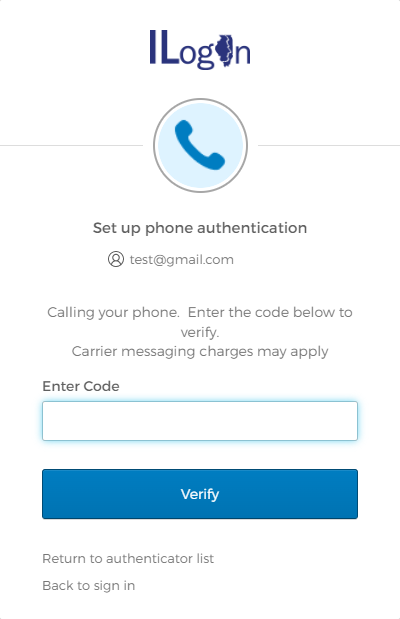
7. Enter your phone number and click Receive a code via SMS or Receive a code via voice call. ILogin sends you a text message or voice call and the Enter Code field appears.
On your phone:
8. Find the text message with the verification code and open it. If you selected Voice call, answer the call to receive
the verification code.
In ILogin:
9. In the Enter Code field (shown right), enter the code from the text message or voice call.
10. Click Verify.
Back to Top
MFA Option: Set Up Security Question
In ILogin:
- In ILogin on the Set up security methods menu, click the Security Question Set up button.
- Enter the Password and click Verify.
- An MFA verification request appears to verify that you are signing in.
- Complete the requested procedure and click Verify.
- Click Set up (shown right).
- Select Choose a security question or Create my own security question.
- Choose or Create a security question.
- Enter the Answer to the security question.
- Click Verify.
Back to Top
4. Set Up Password Recovery
After you’re done adding at least two security methods, click Set Up Later to access the ILogin dashboard. Remember:
- If you have a mobile phone, set up either the Phone - SMS (text) or Phone - Voice Call option.
- If you don't have a mobile phone but do have a landline phone, use the Phone - Voice Call option.
- If you don't have a mobile or landline phone, ILogin uses your email or security questions for password recovery.
Back to Top
Everyday ILogin Steps
After account setup, these are the steps you follow for everyday use.
1. Sign In to ILogin
After your ILogin profile is created, or if you're an existing user in Illinois state programs, follow these steps to sign in and display the ILogin dashboard.
- Go to the
ILogin Sign In page at
https://ilogin.illinois.gov.
- In the Email or Username field, enter your user ID (email address).
- Click
Next.
- In the Password field, enter your password (shown right).
- Click Verify. An MFA verification request appears to verify that you are signing in.
- Complete the requested procedure and click Verify. The ILogin dashboard appears.
This and the following sections are detailed in the
Daily Sign In and ID Verification Procedures PDF.
Back to Top
2. Respond to Multifactor Authentication Requests
After signing in to ILogin, an MFA verification request appears to verify that you are signing in. Complete the requested procedure and click Verify.
Respond to Phone - SMS (Text) Authentication
When ILogin requests SMS authentication:
- In ILogin: Verify or enter your phone number and click Receive a code via SMS. ILogin sends you a text message. The page expands to display the Enter Code field and a
Verify button.
- On your mobile phone: Find the text message and open it to find the verification code.
- In ILogin: In the Enter Code field, enter the six-digit code from the text message.
- Click Verify.
Back to Top
Respond to Phone - Voice Call Authentication
When ILogin requests Phone - Voice Call Authentication requests authentication:
- In ILogin: Verify or enter your phone number and select Receive a voice call instead. ILogin will call you at the number provided. The page expands to display the Enter Code field and a Verify button.
- On your phone: Answer the phone call to hear the verification code.
- In ILogin: In the Enter Code field, enter the five-digit code from the text message.
- Click Verify.
Back to Top
Respond to Okta Verify
In ILogin, when Okta Verify requests authentication, it will request a
code displayed in the Okta Verify app.
- On your phone, open the Okta Verify app and find your email account.
- The verification code is displayed under the email account.
- In ILogin, enter the code and click Verify (shown right). The ILogin dashboard appears.
To send an Okta approval request to the mobile phone:
- Click Verify with something else then select Get a push notification.
- Your phone displays a notification that says
Did You Just Try to Sign In? The notification may be small or a full page, depending on whether your phone is locked or unlocked.
- Tap (or
tap and hold) to open it.
- Select
Yes, it’s me. The ILogin dashboard appears.
Back to Top
Respond to Google Authenticator
In ILogin, when Google Authenticator requests authentication:
- On your phone, open the Google Authenticator app and find your email account.
- The verification code is displayed under the email account.
- In ILogin, enter the code and select Verify. The ILogin dashboard appears.
Back to Top

3. Respond to ID Verification
Some (not all) state applications contain personally identifiable information (PII) that must be safeguarded. These applications require you to periodically verify your identity using ID Verification (IDV).
Note: IDV does not affect your credit score. For more details on IDV:
How ID Verification Works
1. If an application requires IDV, when you select that application on the ILogin dashboard, the Identity Proofing page appears. Check the Terms & Conditions box and select
Next.
2. In the Basic Information page, enter your name, address, date of birth, email, and phone number(s). The app may or may not require your social security number. Entering it helps IDV match you to your transaction data and history. Select
Next.
3. IDV asks 3–5 general questions about your credit transaction history and data from public and proprietary sources. These are questions that only you can answer, thereby confirming your identity. Answer the questions and select
Submit.
4. One of the following Finish pages appears:
- Success! page: This means your identity is confirmed. Select Continue to Application. Note: If the verification is successful, you may be transferred directly to the state application without a Success! page appearing.
- Unable to Confirm Your Identity page: This may occur because:
The basic information you entered didn’t match the historical data, such as an incorrect address or SSN.
You answered one or more questions incorrectly.
The system timed out before you completed all the questions.
ID Verification Failure Options
If the verification is not successful, the Unable to Confirm Your Identity page may offer other alternatives, such as:
- Agency contact information, IDV contact information, or the in-person verification option.
- A
Restart button to repeat the IDV process. This returns you to the Terms & Conditions page, after which is the Basic Information page where you can verify you entered the correct data.
Note: Restarts are determined by the agency and may not be available.
- An
Exit button to return to the ILogin dashboard.
Back to Top
Change Your ILogin Profile
After completing account setup, MFA, and password recovery steps, you may need to change the data in your ILogin account. This section shows short steps. For detailed steps, download the
Daily Sign In and ID Verification Procedures PDF and go to the
Edit Your ILogin Profile section.
This section is detailed with screen images in the
Create a New ILogin Account PDF.
Access Your Account Settings
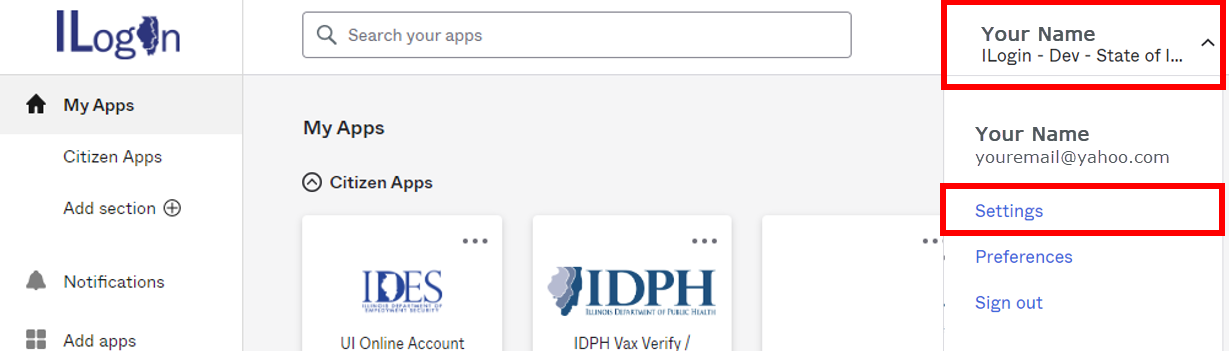
- Sign in to ILogin and display the ILogin dashboard.
- In the top right, select your user name or the down arrow next to it.
- Click Settings.
- The Account page opens for editing.
Edit Personal Information
- Sign in to ILogin and display the ILogin dashboard.
- In the top right, select your user name or the down arrow next to it.
- Click Settings.
- Scroll to the
Personal Information section.
- In the top right, select
Edit.
- Edit the fields as needed and select
Save.
Edit the Display Language
- Sign in to ILogin and display the ILogin dashboard.
- In the top right, select your user name or the down arrow next to it.
- Click Settings.
- Scroll to the Display Language section.
- In the top right, select
Edit.
- Edit the fields as needed and select
Save.
Change Your Password
- Scroll to the Security Methods section and click Reset beside the Password field.
- Click Yes to confirm.
- Verify with an MFA security method to reset your password.
- When successful, the Password page opens for editing.
- Enter the current password and click Verify.
- Enter the New password.
- Re-enter the New password again to confirm.
- Click Reset Password. A Password changed successfully message appears.
Add or Remove Multifactor Verification Options
Multifactor authentication (MFA) options are changed in the Security Methods section.
-
Scroll to the Security Methods section.
-
Remove or set up an MFA option:
- MFA options already set up display a
Remove button. To remove the option, click Remove.
- MFA options that aren't set up display a
Set up button. To set up an option, click Set up.
Follow the steps in
Set Up Multifactor Authentication Menu.
Back to Top
Recover Your Password or Account
Recover Your Password with a Text Message
- Scroll to the
Forgot Password Text Message section.
- Select
Add Phone Number.
- Follow the steps in Set Up Password Recovery.
Recover Your Password with a Voice Call
- Scroll to the
Forgot Password Voice Call section.
- Select
Add Phone Number.
- Follow the steps in Set Up Password Recovery.
Back to Top
Unlock Your Account
If your account is locked, be aware that it automatically unlocks after 60 minutes.
First, try these things:
Confirm that you entered your user name (email address) and password correctly.
Try resetting your password.
It may be a connectivity issue to the ILogin site. Try these things:
-
Refresh the ILogin page.
-
Close your web browser session and restart it.
-
Clear your browser cache.
-
If you're on a computer, restart it.
-
Check your wifi, modem, and/or router.
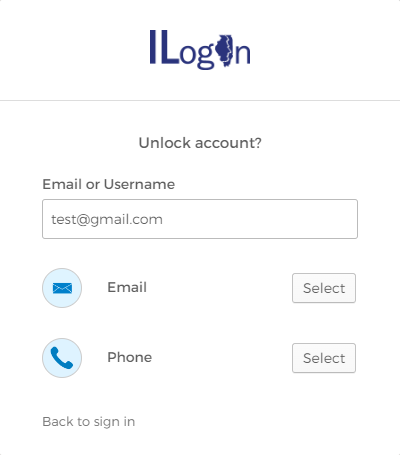
To unlock your account before 60 minutes:
- On the
ILogin Sign In page, click the Unlock account? link.
- Enter your Email or Username.
- On the next page, enter your email address again.
- Select a recovery option and continue with the steps below.
Note: SMS (text) and Voice Call options are available only if a recovery phone number was entered in Set Up Password Recovery.
Option: Phone - SMS
- If you select this option in ILogin, an Enter Code and Verify field appears.
- On the phone number entered during Password Recovery setup, look for a text message with a code.
- In ILogin, enter the code and click
Verify.
Option: Phone - Voice Call
- If you select this option in ILogin, an Enter Code and Verify field appears. ILogin calls the phone number entered during Password Recovery setup.
- Answer the call and listen for the code.
- In ILogin, enter the code and click
Verify.
Option: Email
- If you select this option in ILogin, click Send me an email.
- Open your email from
State of Illinois <ILogin.No-Reply@illinois.gov>.
- Click the
Unlock Account button. A verification message appears.
- Click Back to sign in and sign in again.
After you unlock your account, you may also need to complete the Forgot Your Password process.
Back to Top
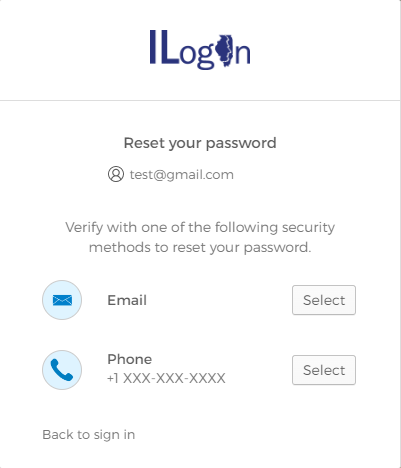
Forgot Your Password
To
reset your password after you sign in, follow the steps in
Change Your Password.
If you
forgot your password, reset it using these options.
- On the
ILogin Sign In page, enter your Email or Username and click Next.
- Click Forgot password?
- Select a recovery option.
Note: SMS (text) and Voice Call options are available only if a recovery phone number was entered in
Set Up Password Recovery.
Option: Reset via SMS
- Click the Select button beside Phone, then Receive a code via SMS. An Enter Code and Verify field appears.
- On the phone number entered during Password Recovery setup, look for a text message with a code.
- In ILogin, enter the code and click
Verify.
Option: Reset via Voice Call
- Click the Select button beside Phone, then Receive a voice call instead. An Enter Code and Verify field appears as ILogin calls the phone number entered during Password Recovery setup.
- Answer the call and listen for the code.
- Enter the code and click
Verify.
Option: Reset via Email
- If you select this option in ILogin, click Send me an email.
- Open your email from
State of Illinois - ILogin.No-Reply@illinois.gov.
- Click the verification link in the email.
Back to Top